
We have a handheld device that can use its tri-band Wi-Fi radio to do all sorts of troubleshooting and analysis testing. But what if you want to save a Packet Capture?
No worries – these Android Based Hand-Held devices have a built-in app to allow for packet captures. (Note the AirCheck G3 will only capture from its Wi-Fi adapter – but the other two offer the ability to also capture from their wired ports)
The Capture App Icon looks a bit like a ‘butterfly net’ gathering ones and zeros… kind of appropriate for what it does!
When you first start the Capture app, you are shown a screen with the current settings – and a button on the top right allows you to Start. But first we need to head over to the settings and make sure we have configured the radio to listen on the correct channel and channel width to capture the Wi-Fi Frames we are after.
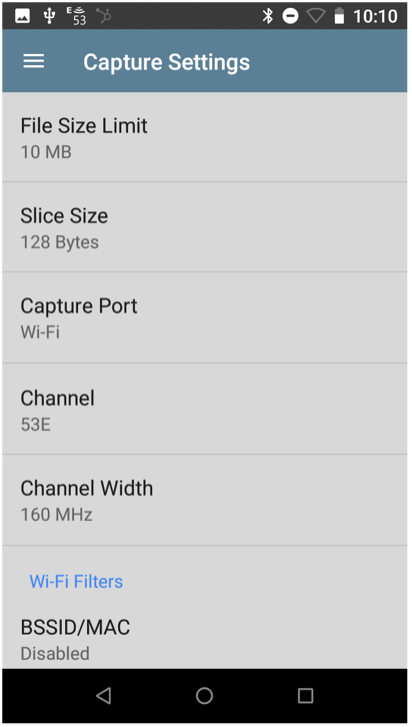
You can set the size of file you want to save, as well as the size of each frame you want to capture. Many times, we are working to find Wi-Fi issues, and only need to slice off the first 128 Bytes or so, just enough to get the MAC headers of our frames. (though if you are troubleshooting higher layer issues, you can set this to full frame)
You’ll also need to set the Channel you want to listen on, as well as the channel width. (Sure, you can set it to 20MHz and capture the Management and Control Frames sent on the primary channel, but to get the data frames, it is best to set the channel width to the same width as your target devices are using)
Note: Luckily, we already have that data at our fingertips from using the Wi-Fi app and looking at the Wi-Fi Channels Map to see which channels are in use, then drill down to the Channel Details for the Channel Width information elements.
If you want to see ONLY a specific client device and its communications, you may put in a Capture Filter to only collect frames to or from that MAC address.

But you can also apply a Display Filter once you get the packet capture file over to Wireshark…
Additionally – you can turn on/off whether the packet capture will gather other 802.11 frame types – Control, Management and/or Data frames… and even a way to filter only Beacon Frames. There is a lot of information available for Wi-Fi troubleshooting in these other frames, so I like to collect them. Then if they feel ‘in the way’, I can always filter them with a Display Filter in Wireshark during analysis.
A simple Start, and you can watch as the capturing frames are saved and tracked on screen – with color-coding for the Control, Management and Data frame types. Just watching these ratios can also be a good troubleshooting technique!
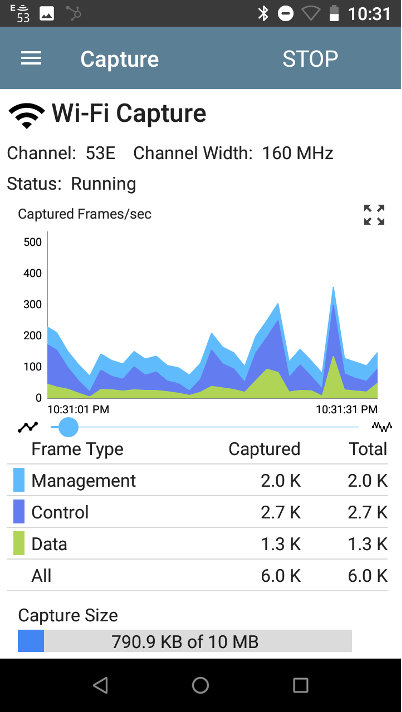
When you are done collecting frames, you can stop the capture, and save the file. Remember to give it some additional information to help remember what you were trying to capture.

This file can then be saved to NetAlly’s Link-Live service, or copied to a local USB drive, or an SD card for transfer to your laptop for Wireshark analysis.
I personally like the ease of use in using a USB-C thumb drive to easily copy it to my MacBookPro for analysis.
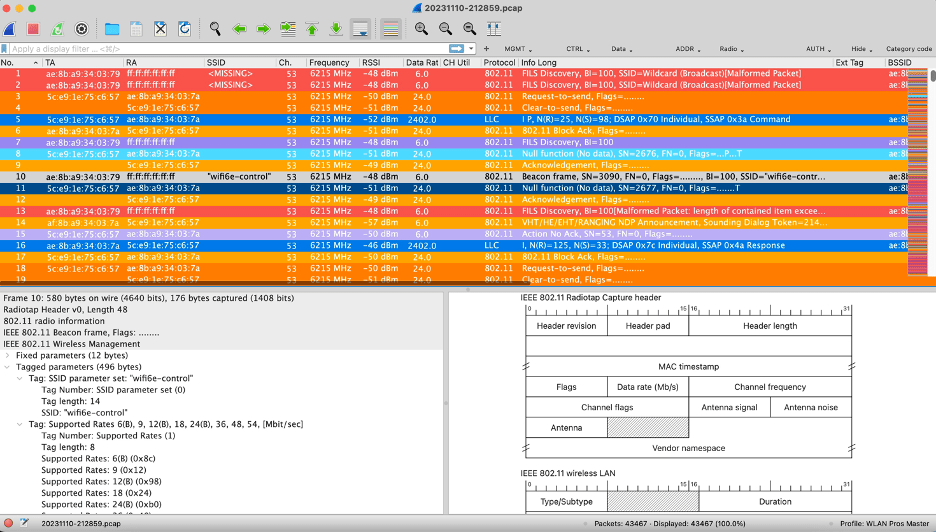
The file should open in your copy of Wireshark and allow you to do your Wi-Fi/802.11 Frame analysis.
Note: If you also captured a 4-way handshake and remember the SSID and PSK, you can also do higher level decodes by allowing Wireshark to do the encryption decoding.
Note we captured on a 6GHz channel and can see the 802.11 information in the Wireshark windows.
It really is that easy to use a tool you may already have to do packet captures easily in 2.4GHz, 5GHz, and/or 6GHz frequencies.
Happy Wiresharking!