The goal of wireless networks is to provide an appropriate and workable RF implementation for the accurate transmission of data across a wireless medium.
To this end we work hard to get the correct number of access points with the proper power and channel settings using the best antenna patterns to cover the area we are interested in. In the simplest terms, there are three design specs to consider.
First there is the ‘Want‘ – what we are designing for.
Second – the ‘Don’t Care’ – the level of RF that we don’t care about.
Third – In between the above two items – ‘Don’t Want’ – where we find same-channel (co-channel) interference.
Want
In the ‘old days’ when we employed the ‘AP on a stick’ method of site surveys in a pre-deployment mode, trying to come up with the best possible design, we’d end the survey with a design showing access points and their ‘coverage’ patterns. (sometimes called a heat map – though it had absolutely nothing to do with heat)
In this ‘AP on a stick’ process, after placing an access point in a temporary position we’d walk away until we reached the lower limit of our design goal. Perhaps -70dB or -67dB… then we’d stop. We met the design goal in that direction, so we’d stop.
But the RF energy projecting from the access point in question did not stop, it kept going. Since we never completed the Site Survey to the end of the radiation pattern, our designs did not, and could not, tell us where we’d run into interference with other access points.
This would give us what we wanted… Thus this is the WANT area.
The want area is normally defined to meet a specific design requirement based on the devices we’re designing for. Perhaps a -67dBm for voice, or a -75dBm for a hand-held scanner device.
This is the ‘easy’ one. Remember “Coverage is Easy”. See other article on “How to Spec your Physical Layer”
Coverage patterns looked something like this, with nice simple circles all lining up in neat rows.

NOTE: the -67dBm, and -86dBm used in the following examples are SAMPLES ONLY – Not indicative of any specific design!!
Don’t Care
Lets talk about the second RF design consideration next. This is the area where there is RF radiation, but at a level that is below the threshold of our device to actually use.
I call it the DON’T CARE area. In the don’t care area, there is too little RF to make the client (STA) stop and wait for another client or access point to finish talking.
In other words, the amplitude of RF signals in this area are too low to be considered in the frequency’s collision domain.
With AirMagnet Survey, we can raise the color bar on the right side to make the areas with signals weaker than a given threshold turn grey.
This is usually set to -85dBm, but some devices are more sensitive and you might need to set your Don’t Care to -90dBm.

Don’t Want
Now we get to the difficult one. This is the one we normally don’t even measure in an ‘AP on a Stick’ survey.
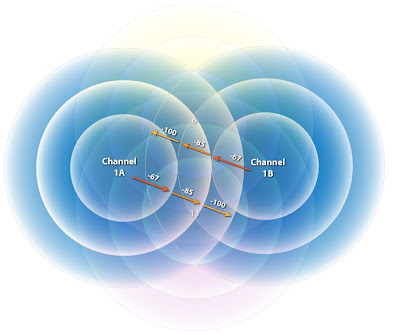
One vendor draws their graphics to explain this, as shown in the following diagram. Note the WANT area is inside the dark circle, and the RF that is less than the desired goal still continues to radiate, causing interference and a large collision domain to all devices within the larger circle.

The trouble isn’t when two access points are next to each other. Since we have channels 1, 6, and 11 to use as non-overlapping channels, we can have a little ‘buffer’ between the same channels.
The problem starts when we don’t ‘look’ to see where the DON’T WANT area is in our survey. We never notice the access point’s RF that is less than what we want, which continues all the way past the buffer zone and into the next sam- channel access point’s space.
One graphic from a vendor details it like this.

This graphic shows that you must keep at least a 19dBm difference on the same channel from the ‘want’ to the ‘don’t want’ areas.
Another way to look at the situation between same-channel coverage pattern overlaps looks like this. 
I ran a little online survey, and folks were just about evenly split between the above graphic and the following graphic.
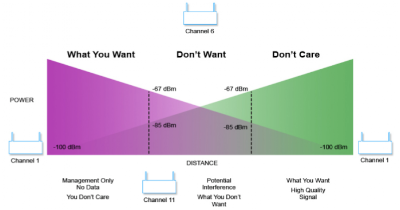
I think an easier way to explain this situation is to turn the graphic on its side, like this. 
Leaving the access point on the left, the RF propagates and looses RF energy along the way until it reaches the design goal, or the want line. We normally stop at this point in our surveys, but you must continue on to see where the RF continues.
The signal degrades and attenuates as we go further to the right, eventually reaching the level at which we no longer care. This is the don’t care line.
In between the access point on the left and the access point on the right is the area that is below the design goal threshold. This area should be covered by the other two access points on channels 6 and 11.
Coming back from the right, we have the same thing. The access point on the right on channel 1 starts strong, and as we move to the left, continues to get weaker until it reaches the design goal (want). After that, there is still RF on channel 1, but it is below our goal, and thus falls into the DON’T WANT area.
Another name for the don’t want is ‘Interference.’ If the two access points on channel 1 are too close, the signal from the right AP will interfere with the signals from the left AP.
In order to get access points on the same channel closer together (get the angles of the dropping signals to be steeper), you must lower the power.
Higher power gives you a longer ‘tail,’ and lower power give you a shorter ‘tail’.

Setting AirMagnet AirWise Interference Settings
In AirMagnet AirWise, there is a feature that allows you to visually show where interference meets or exceeds the design parameter. Remember, different devices have different design parameters.

To set the Want, Don’t Want, and Don’t Care values in AirWise we need to re-label them to meet the AirMagnet vocabulary.
The end of the want area is the same as your design goal for Minimum AP signal strength required.
The end of the Want value IS the start of the Don’t Want area (if it is below our want, it must be our don’t want) In AirWise, this is labeled with a weird English phrase of “Interfered APs: Exclude APs signal if strength is weaker than.”
The end of interference, where the signal is below the threshold of causing any harm, is called the Don’t Care. In AirWise, this is labeled with a second instance of the phrase “Interfering APs: Exclude APs signal if strength is weaker than.”
Conclusions
So there you go; simple, easy terms to define where you Want RF, where the RF signals on a specific frequency will cause interference — Don’t Want — and the area where the signal is too weak to make a difference — Don’t Care.
Orem, UT, USA
Additional Article for Support of WLAN Site Surveys
– 7 Rules for Accurate Site Surveys
– How to ‘Cheat’ Using Survey – Don’t be a Victim
– How to Properly Analyze Survey Data
– The Fallacy of Channel Overlap
– Predictive Survey vs Onsite Survey – What’s the Big Deal?
– How to ‘Spec’ your Network’s Physical Layer
– Want, Don’t Want, Don’t Care – Meeting Design Specs
– The Truth about SNR – Where Did that ‘N’ Come From Anyway?
– What is an Access Point Anyway – Hub, Bridge, Switch or Router?
– Passive vs Active – What’s All the Fuss About?
– The False God of dB
– Meeting All Device Design Parameters
